Learning the Primal 13 Core Movements
In this section we will learn the choreography of the Primal 13 short form. The emphasis here is on correct structure, distance and position only. We’re not yet concerned with timing, flow or the expression of force or energy. We are simply building the framework which will allow us to practice and build upon.
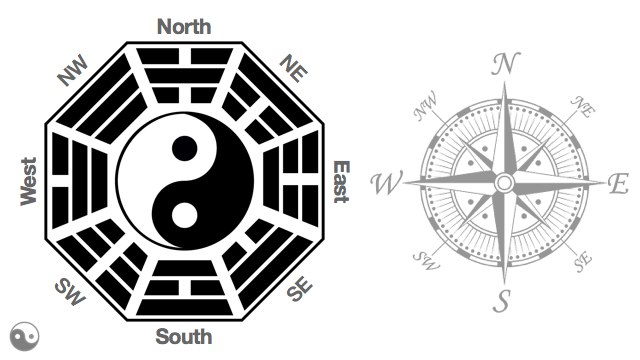
For simplicity we are going to use the eight cardinal directions of a compass when we describe directions. This happens to connect nicely to the eight trigrams of Yang Bagua as shown below, but the objective is to have clear reference points. Regardless of which direction you are actually standing, we are going to call the direction you are facing in the beginning “North.” A turn 45-degrees to your right would be Northeast, while a 90-degree turn to your right would be East.
Throughout the descriptions we’ll give mostly anatomical directions and indicators. We’ll describe them fully the first-time we use them, then be more concise with the directions as you get used to the terms. Throughout this phase simply breathe normally, stay relaxed but active, and most importantly: smile.
Opening the Form/Hold the Ball
ORIGIN POSITION: Bring your feet together and stand at perfect attention with the body straight and balanced over the feet. Be relaxed but active. Let the arms hang loosely at your sides. Lift the crown of your head as if being pulled gently by a golden thread from above. Breathe gently and normally. This is Mountain Post (Tadasana) from Yoga.
50/50 STANCE: Pour all of your weight into your right leg, allowing your left side to become weightless. Lift the left heel and let the left foot barely lift from the Earth, then step the left foot out to hip width. Place the left foot on the ground parallel with the right. Pour your weight back to the center with equal weight on both feet. Let your knees bend slightly as you sink your weight into the Earth.
“Hip Width” and “Shoulder Width”
At “hip width,” your feet should fall directly in line with the socket of your hip joints. The feet should have enough room for a third foot in between them. At “shoulder width” your feet should be in line with the socket of the shoulder joints. Here there should be room for a pair of flip-flops between your feet.
LIFT THE ARMS: Keeping your elbows extended, lift both arms into the classic “sleep walker” pose with the arms fully extended in front of you at shoulder height. As the arms come up let the knees slightly straighten, giving your body the sensation of growing taller while still rooted to the ground. The extended arms should be buoyant as if floating on shoulder-deep water. Let the fingertips float up until the hands and arms are in one line.
HOLD THE BALL: Let the elbows bend and sink straight towards the Earth, gently dragging the wrists and hands with them. Pour your weight fully into your left foot. Allow the weightless right foot to pivot on the ball of the foot, pointing the heel to the Southeast. Turn your waist 45-degrees to align with your right knee so that you are now facing Northwest. Sit into your right leg, pouring all of your weight into your right heel. Bright the weightless left foot beside the right, with your left toes gently resting on the Earth beside the arch of your right foot. As you bring your left foot to your right, circle your arms into the classic “Hold the Ball” pose with your right arm on top and your left arm underneath.
“Hold the Ball”
Imagine you are holding an inflatable beach ball in front of your chest. Rest your right wrist on the very top of the ball and let your arm naturally follow the curve of the ball. Your elbow and your armpit should be open and relaxed. The left arm cradles the ball from underneath, with the left wrist supporting the very bottom point of the ball.
Grasp Sparrows Tail Left
(Ward Off, Roll Back, Press, Push)
WARD OFF: Look to the West. Keeping all of your weight on your right foot, kick the left foot directly behind you as if you were trying to flick away a stone that was underfoot, then step the left foot out 45 degrees to the West and touch the heel down. Pour most of your weight into the left heel and let the hips and navel realign to the West. The right foot remains braced firmly against the ground in a Bow Stance. As your navel aligns West, the bottom left arm rolls forward to a horizontal “hold the ball” posture with the elbow and wrist at the same height. The right arm relaxes. The right elbow sinks and draws the right wrist down to float near the right hip.
ROLL BACK: Someone to your West is now handing you a football. Reach out and take it with both hands, with your left hand on top and the right hand cradling the ball underneath. Without moving your feet, now pass the ball to a person directly behind you in the East. Begin by pouring more of your weight into your rear, right leg, and let the body pivot at the waist as the hands roll down and then back. As you “hand off the football” at the extension of this pose, your right hand is now on top and the left is underneath.
PRESS: Begin to pour your weight back into your left heel and pivot your body back towards the West. As your gaze passes North you spot a small butterfly. Gently cup the butterfly in your hands with your left hand held horizontally and your right hand held vertically. Continue the pivot until you return to the left Bow Stance and you press the hands holding the butterfly along the line to the West.
PUSH: Separate your hands and release the butterfly, softly turning your palms towards the horizon. That’s when you notice a GIANT beach ball is rolling towards you like Indiana Jone’s famous scene in Raiders of the Lost Ark. Sit back and sink your weight fully into your right leg as you “catch” the giant ball with your outstretched palms. Absorb the rolling motion of the ball, letting your elbows sink down and back towards your ribs as your palms face outwards towards the West. Lift the toes of the left foot to provide a kick-stand to stop the ball. Your forearms should now be parallel to the ground, placing you in the perfect position to push the ball away. Pour your weight forward into your left heel as you return to the braced Bow Stance and push the giant beach ball up and away.
Catching Stars
CATCH THE STAR: As the giant beach ball bounds away you see that standing directly to your West is a deadly ninja. He takes a sharp silver throwing star from his sleeve and flicks it directly towards your heart. As a Tai Chi master, you are unconcerned. Turn your palms to face each other and catch the spinning star as it flys towards your chest. Sit back into your right leg and straighten your left leg, keeping your left foot flat on the ground. Absorb the force of the ninja star by deflecting it to your right, turning the waist as you catch the star between your palms.
BRACE WITH BLADE: Open your hands and turn your palms towards the ground, letting the ninja star fall to your feet. As you pour your weight back into the left heel one last time, coming back into the Bow Stance, lift your left arm into a L-shaped brace held horizontally in line with your shoulders. the elbow should be bent 90 degrees forming a right angle, with wrist and elbow at approximately the same height. Place the fingers of your right hand on top of your left wrist as if you were hiding your watch. Feel the solidly-braced posture of the bow stance, and notice how the blade of the forearm – the ulna or the sharp bone on the pinky side of the forearm – creates a square frame to the West.
Forward Kick Left
HANDS AND SOLE: Lift both hands together so that the wrists remain crossed but raised to the level of the crown of the head. Palms should be facing West. Pour all of your weight into your left foot and separate the hands, tracing the circumference of a giant circle in the air. Step your right foot beside your left as your hands come back together at the bottom of the circle. Shift your weight fully onto your right foot. Lift your left knee straight up as your lift your hands – again crossed at the wrists – directly in front of your heart. Your left foot should hang down. Now open the hands, separate them and press both palms towards the West. Simultaneously lift your left leg and press the sole of the foot to the West. In the final posture you are balanced on your right leg with your hands and sole of the left leg pressing Westward.
Caution: Single-Leg Stances
For all single-leg and balancing postures, always use caution and work within your personal capabilities. If you have any challenges with balance, strength or flexibility, modify the pose as needed. Do not lift the leg as high, or use a chair, walking cane or other prop for assistance.
Play the Lute
PLAY THE LUTE: From the extended forward kick to the left, simply keep your weight fully in the back right leg and lower the left leg until the heel touches the ground. Relax and sink both elbows, and turn the wrists to face both palms towards the centerline. Keep the left hand more forward, and pull the right hand closer to the chest, approximately inline with the elbow of the left arm.
Single Whip
HOOK AND CENTER: Pinch the fingers and thumb of the extended left hand and point the hook straight down like a clothespin. That will freeze the left hand in space for this posture. Lift your right hand with your palm in front of your face and take a selfie. Step the left foot beside the right; place the left toes in line with the right arch and turn the left heel out so the left food is aligned with toes to the North and heel to the South. Pour your weight into your left leg. Pivot your waist and turn your hips and navel north.
SINGLE WHIP: Look East at your friend who’s standing to your right. Turn your palm out to show your friend your cool selfie as you step the right foot to the East. Let the left heel slip as you come into a right Bow Stance. Your left arm trails behind you to the West, pinned in a hook, while your left arm extends to the West to show off your mad selfie skills. With the arms extended, this posture is very similar to Virabhadrasana II or the “Warrior Two” pose from Yoga.
Hold the Ball
HOLD THE BALL: Pour your weight into your right leg and step your left foot up a half-step. Point your toes to the Northeast corner, then pour your weight back into your left leg. Circle your left arm into the top “Hold the Ball” posture, circle your right arm to cradle the ball from underneath, and retract the right leg to gently touch the right toes beside the arch of the left foot. Sink your weight and orient your hips and navel to the Northeast corner.
Grasp Sparrows Tail Right
(Ward Off, Roll Back, Press, Push)
WARD OFF: The entire Grasp Sparrows Tale sequence now repeats on the right side. From the Hold the Ball posture, kick the right foot backwards, then step the right foot out 45 degrees to the East and touch the heel down. Pour most of your weight into the right heel and let the hips and navel realign to the East. The left foot remains braced firmly against the ground in a Bow Stance. As your navel aligns East, the bottom right arm lifts to a horizontal “hold the ball” posture with the elbow and wrist at the same height. The left arm relaxes, the left elbow sinks and the left wrist sinks down to float near the left hip.
ROLL BACK: The football hand-off is now coming from the East. Reach out and take the football with both hands, this time with your right hand on top and the left hand underneath. Without moving your feet, pass the ball to the person behind you in the West. Pour your weight into your rear, left leg, and let the body pivot at the waist as the hands roll down and then back. Hand off the football at extension with your left hand on top and the right hand underneath.
PRESS: Pour your weight back into your right heel and pivot your body back towards the East. As your gaze turns North, gently cup the butterfly in your hands with your right hand held horizontally and your left hand held vertically. Continue the pivot until you return to the right Bow Stance and you press the hands holding the butterfly along the line to the East.
PUSH: Separate your hands and turn your palms towards the horizon. Sit back, sink your weight fully into your left leg and catch the incoming giant beach ball with your outstretched palms. Sink your elbows down and back towards your ribs as your palms face outwards towards the East. Lift the toes of the right foot into the kick-stand with your heel on the ground. Your forearms should be parallel to the ground as you push the ball up and away. Pour your weight forward into your right heel as you return to the braced Bow Stance.
Carry Water to Temple
LIFT THE WATER BUCKET: Step the left foot along side the right foot with the bases of the big toes lightly touching. Let the left hand sink towards your waist as the right hand circles to the left side of the body and presses downwards with the palm, as if plunging down the handle on an old manual water pump. Bend the knees and sink your weight into your heels, allowing your hips and bottom to press backwards. Do not round your back, but keep your shoulders over your heels. Bend the left elbow and circle the left arm to bring your palm towards your knees as if you were threading your forearm into the arched handle of a water bucket. The bucket is very heavy, so grasp your left wrist with your right hand in a thumbless grip and lift the bucket off the ground. Lift your head and look up the long, steep stairway to the temple ahead. Let the spine straighten as you pull the shoulders back and absorb the weight of the water bucket.
Needle at Sea Bottom
HAND TOWARDS TOE: Release the grasp of your left wrist and let the right hand come into half of a prayer-hands shape in front of your heart. Float the left palm down to your left side as if placing the hand on a large rock for balance. Pour your weight into your left leg and step the right leg straight back to the West, touching down with your toes. Now sink all of your weight backwards into the right leg, letting the left leg become weightless with the heel gently lifting and the toes softly touching the ground. Being careful of your balance, bend at the waist and fold forward, tracing the fingers of the right hand downward along the centerline towards the left foot. The right hand should be open flat, palm facing North, with your fingers in line with your navel and nearly touching the ground near your left toes.
Step Forward and Raise Elbow
DRIVE FORWARD WITH VERTICAL ELBOW: Driving from the right rear foot, raise the head and shoulders and take a full step forward to end in a right Bow Stance facing East. As you step, lift the right hand and – while keeping your elbow bent sharply – bring the palm to your right ear. Your right forearm should be nearly horizontal with the tip of the elbow driving forward at approximately nose height. The fingertips of the left hand gently touch the tip of the right elbow with the left arm relaxed and elbow sinking towards the Earth.
Horizontal Elbow and Brace
Remaining stationary in the right Bow Stance, feel the connection between the left fingertips and the right elbow. Sink the right elbow to your ribs, dragging the fingertips of the left hand with it. Allow the left elbow to circle and float up until it points out to the East in line with your heart. Gently brace your left wrist with your right palm and guilde the back of your hand to the center of your chest.
Step Backward and Brace
Keep the right palm on the back of the left wrist but allow the left elbow to circle and sink back to the ribs. Here both elbows should be pointing to the Earth and your hands are crossed at the wrists, left hand over right, palms facing East at heart level. Pour your weight into your left leg and let the hands separate into the classic “Stop!” gesture as you take a full step backwards into a braced left Bow Stance.
Forward Kick Right
HANDS AND SOLE: Let the hands turn horizontal, fingertips-to-fingertips, as both elbows lift out to the side to shoulder height. Pour your weight into your left leg and step the right toes up beside the arch of the left foot as both hands trace the circumference of a giant circle. At the bottom of the circle the hands will again cross at the wrists, this time right hand over left with the palms facing your body. Lift the hands up your centerline to heart level, lifting the right knee as the hands raise. Open the hands and press both palms to the East as you lift the right leg and press the sole of the foot to the East as well.
Box the Ears
GOLDEN ROOSTER POSTURE: Withdraw both hands and the right foot: the open palms turn inwards towards your body at about heart height, elbows bent and pointing straight down close to your ribs; the right knee bends and lifts to waist height as the right toes point straight down.
BOX THE EARS: The deadly ninja reappears before you in the East. Sink your weight into your left leg and set the right heel down one step forward towards him. Pour your weight forward into the right Bow Stance. As you move into the stance, raise both elbows to your sides and let your arms unfold like the wings of a giant crane (think of the Karate Kid’s famous pose, but with arms at shoulder height). Guide the hands through a wide horizontal circle, then bring them almost together as if you were going to clap your hands, but stop the hands about six inches apart, palms facing. The hands should be at eye level, as if you just slapped both ears.
Play the Lute
PLAY THE LUTE: Pour your weight back into the rear left leg. Let the right leg relax and lift the toes, keeping the right heel on the ground. Relax and sink both elbows, keeping the right hand more forward, and pull the left hand closer to the chest, approximately inline with the elbow of the right arm.
Reeling Silk
UNSPOOLING THE RIBBON: Turn your right hand palm up as if you are holding a spool of thin silk ribbon. The ribbon is stretched to the East, pinned to the chest of your ninja, just beyond your right fingertips. Moving smoothly to avoid breaking the ribbon, withdraw your right foot and set it down with your toes near the arch of the left foot. Your right foot should now be facing North, using the same footwork that you used for Single Whip. As your body pivots North, scoop your right hand over the top of the ribbon and then come underneath with palm up. Look West. Pour your weight into your right leg and step your left leg to the West, letting the right heel slip as you come into your left Bow Stance. Unspool the ribbon by stretching both hands to the West, the right fingertips resting gently on the left wrist with both palms facing up.
Part Wild Horses Mane Left
HORSE STANCE: Maintaining the Bow Stance distance between the feet, pivot on both heels to turn the toes to the North. Pivot the waist to bring your body into perfect balance between both feet, hips and navel facing North. With both palms open flat, bring the right hand to the heart and the left hand to the groin. The fingertips of the right hand are pointing straight up, palm facing West; fingertips of the left hand are pointing down with the palm facing East.
PART WILD HORSES MANE: Pour your weight into your right leg. As the left leg becomes weightless, circle it first beside the right foot, then arc it out behind you before stepping down into the left Bow stance with toes pointed East. Let the right heel slip as your pivot your body left from the waist. As you pivot, slide the right hand to the left shoulder and the left hand to the right hip. Coming into the left Bow Stance, swap places with both hands, sliding the right hand (palm down) to the right hip while the left hand (palm up) slides up and then projects outwards to the East at shoulder height.
Part Wild Horses Mane Right
HORSE STANCE: Pivot back to the equal-weighted horse stance with toes, hips and navel aligned Northward. This time the hands are reversed: the left hand is at the heart, fingertips pointing up with the palm facing West, and the right hand is at the groin with fingertips pointing down and palm facing East.
PART WILD HORSES MANE: Repeat a mirror image of the Part Wild Horses Mane posture by circle-stepping your right foot behind you and then pouring your weight into a right Bow Stance. The left hand moves to the right shoulder and the right hand to the left hip during the pivot, then both hands slide along the diagonal plane (palms facing each other). The left hand ends at the left hip while the right hand projects Westward, palm up at shoulder height.
Pluck Lotus/Present Gift
HORSE STANCE: For the final time, pivot back to the equal-weighted horse stance with toes, hips and navel aligned Northward. Bring the hands together in front of your heart, palms facing your chest, wrists crossed with left hand over the right.
PLUCK THE LOTUS: Look up. Turn the hands over without uncrossing the wrists and face the palms in the direction of your gaze. Pivot on your heels and let the toes open slightly to the outsides. Separate the hands and trace the circumference of a giant circle in the air, squatting down and sinking your weight into your heels as the hands arc downward towards your knees. As your hands arc down past your knee-line, look down between your heels: there is now a beautiful lotus blossom growing there. Lift your hips (reversing the squat) as you fold forward at the waist, reach between your heels and pluck the lotus with your fingertips.
PRESENT A GIFT: Sit back down into the low horse stance as you lift the head and heart. Focus the eyes to the horizon and lift the lotus blossom like a gift to the rising sun. Your palms are both up and arms are extended.
Closing Form
RETURN TO ORIGIN: Relax the elbows and bring the lotus blossom to your heart. Press up from the earth into a high horse stance, again pivoting on the heels to bring the feet back parallel.
CIRCLE STEPPING: Pour your weight into your right leg. Lightly brush the shape of a circle on the ground with your left foot, arcing to the back, gently brushing the right foot, arcing out to the front and then returning to the original placement. Now pour your weight into your left leg. Repeat the circle step, arcing to the back and then front, but place the right foot down at shoulder width.
CLOSING: Breathe in deeply and feel the lotus blossom dissolve in your hands. Breathe out and sink into your heels. Breath in deeply, open the elbows and float the hands forward with the fingers towards the horizon at shoulder height, turning the palms towards the Earth. Breathe out and straighten the legs to rise up tall while letting the hands sink down to hang at your sides. Breathe in deeply and pour your weight into your right leg. Bring the left foot beside the right. Breathe out and pour your weight equally into both legs, returning to the original attention posture where we started.
The Tai Chi Principles
Now that you understand the choreography and the core movements of the Primal 13 Tai Chi form we can begin to discuss the expressions of energy that make Tai Chi so different from other mind-body systems and martial arts. To provide context, we need to understand the underlying principles of Tai Chi and the concepts of Yin and Yang, which we will explore in the next lesson.